Avoid your inquiry is delay response, please enter your WhatsApp/Skype along with the message, so we can contact you at the very first time.
We will reply you within 24 hours. If for urgent case, please add WhatsApp/WeChat:
Warning: Undefined variable $public in /www/wwwroot/yuelinhengtong.hyhdemo.top/wp-content/themes/hyhadmin/header.php on line 313
Warning: Trying to access array offset on value of type null in /www/wwwroot/yuelinhengtong.hyhdemo.top/wp-content/themes/hyhadmin/header.php on line 313
,. Or call
Warning: Undefined variable $public in /www/wwwroot/yuelinhengtong.hyhdemo.top/wp-content/themes/hyhadmin/header.php on line 313
Warning: Trying to access array offset on value of type null in /www/wwwroot/yuelinhengtong.hyhdemo.top/wp-content/themes/hyhadmin/header.php on line 313
directly.
Do you love the idea of full, long lashes but worry they will look fake? You want your eyes to pop, but you do not want to look like you are wearing a costume. This is a common problem. Many people want to know how to apply false eyelashes so they look natural.
The truth is, bad application can make even the best lashes look obvious. The corners can lift, the band can show, and they can feel heavy on your eyes. It is frustrating. You might even give up on false eyelashes altogether. This can make you feel less confident and keep you from a simple way to enhance your look.
But there is a solution. With the right tools and a few simple steps, you can learn how to put on false lashes for beginners and get a perfect, natural look every time. This guide will show you everything. You will learn what tools you need, the best step-by-step false eyelash tutorial, how to fix common problems, and how to care for your lashes. You can have beautiful lashes that look like they are your own.
The term “natural-looking” can be confusing. It does not mean the lashes are invisible. It means they enhance your own lashes without shouting “fake.” The global false eyelashes market is worth over USD 1.6 billion, and a huge part of that is for everyday, natural styles. The demand for a “no-makeup makeup” look is growing by about 12% a year. People want enhancement that looks real.
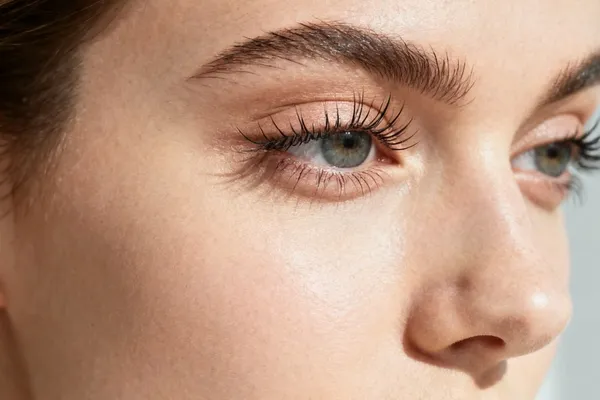
natural look with fake lashes
The type of lash you choose is the first big step. There are three main kinds:
| Lash Type | Description | Best For a Natural Look? |
| Strip Lashes | A full strip of lashes on a single band. They are the most common type. | Yes, if chosen well. They are great for beginners. A strip lash with a thin, clear band can look very natural. They offer a complete look quickly. |
| Individual Lashes | Single lash hairs applied one by one. | The most natural look possible. They take a long time to apply. They are best for filling in your own lashes, not for creating a whole new look at home. |
| Cluster Lashes | Small groups of 2-5 lashes on a tiny base. They are a mix of strip and individual lashes. | Excellent for a custom, natural look. You can add just a few to the outer corner of your eye for a lift. They are more versatile than strips. |
For most people, the choice is between cluster lashes vs strip lashes. A study of over 500 women showed that the main reason for wearing lashes was for aesthetic enhancement (73.3%). Both strips and clusters can give you this, but clusters offer more control for a subtle look.
When you shop for lashes, look for these features. The right product makes all the difference. High-quality production focuses on creating lashes that are both beautiful and comfortable.
You do not need a huge, expensive kit to apply lashes. The problem many beginners face is being overwhelmed by too many products. This leads to confusion and mistakes. The solution is to start with a few key items.
Here is all you really need for a clean, easy false lash application:
Many people think all lash glue is the same. This is a dangerous mistake. Studies on eye health show that up to 80% of eye problems from lashes come from the glue. Harsh glues can release chemicals like formaldehyde, causing itching and redness. This can turn a beauty routine into a painful experience.
The solution is to choose your glue carefully.
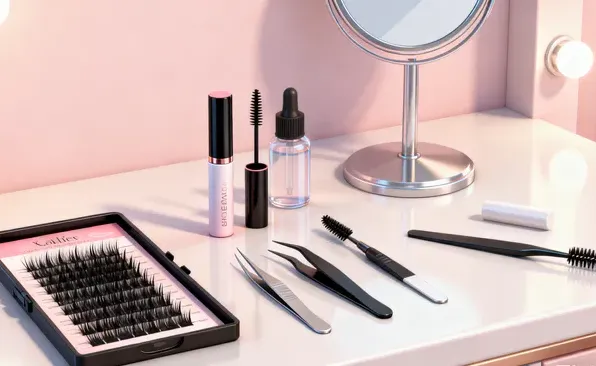
Tools & Products You Actually Need
Have you ever had your lashes just slide off? The problem is often not the lash or the glue. It is the prep work. Your eyelids have natural oils. These oils can break down lash glue and prevent the lashes from sticking.
This is very frustrating. It can ruin your makeup and make you late. You might think, “why won’t my false lashes stick?” and blame the product.
The solution is a clean base. A few simple prep steps will solve this problem.
Use a micellar water or an oil-free makeup remover on a cotton pad. Gently wipe your eyelid and lash line. This removes any oil or old makeup. A clean surface helps the lash adhesive work correctly.
Use an eyelash curler to gently lift your own lashes. This is a key step to curl lashes before falsies. It helps your natural lashes support the false ones. Then, apply one thin coat of waterproof mascara. This gives the false eyelashes a shelf to sit on. It helps blend falsies with natural lashes later on.
This is a great trick for a no eyeliner false lash look. You can use a dark pencil or a liquid eyeliner pen to tightline your eyes. This means applying the color to your upper waterline, right under your lashes. You can also draw a very thin line on your lash line. This helps hide the false lash band and makes the final look seamless.
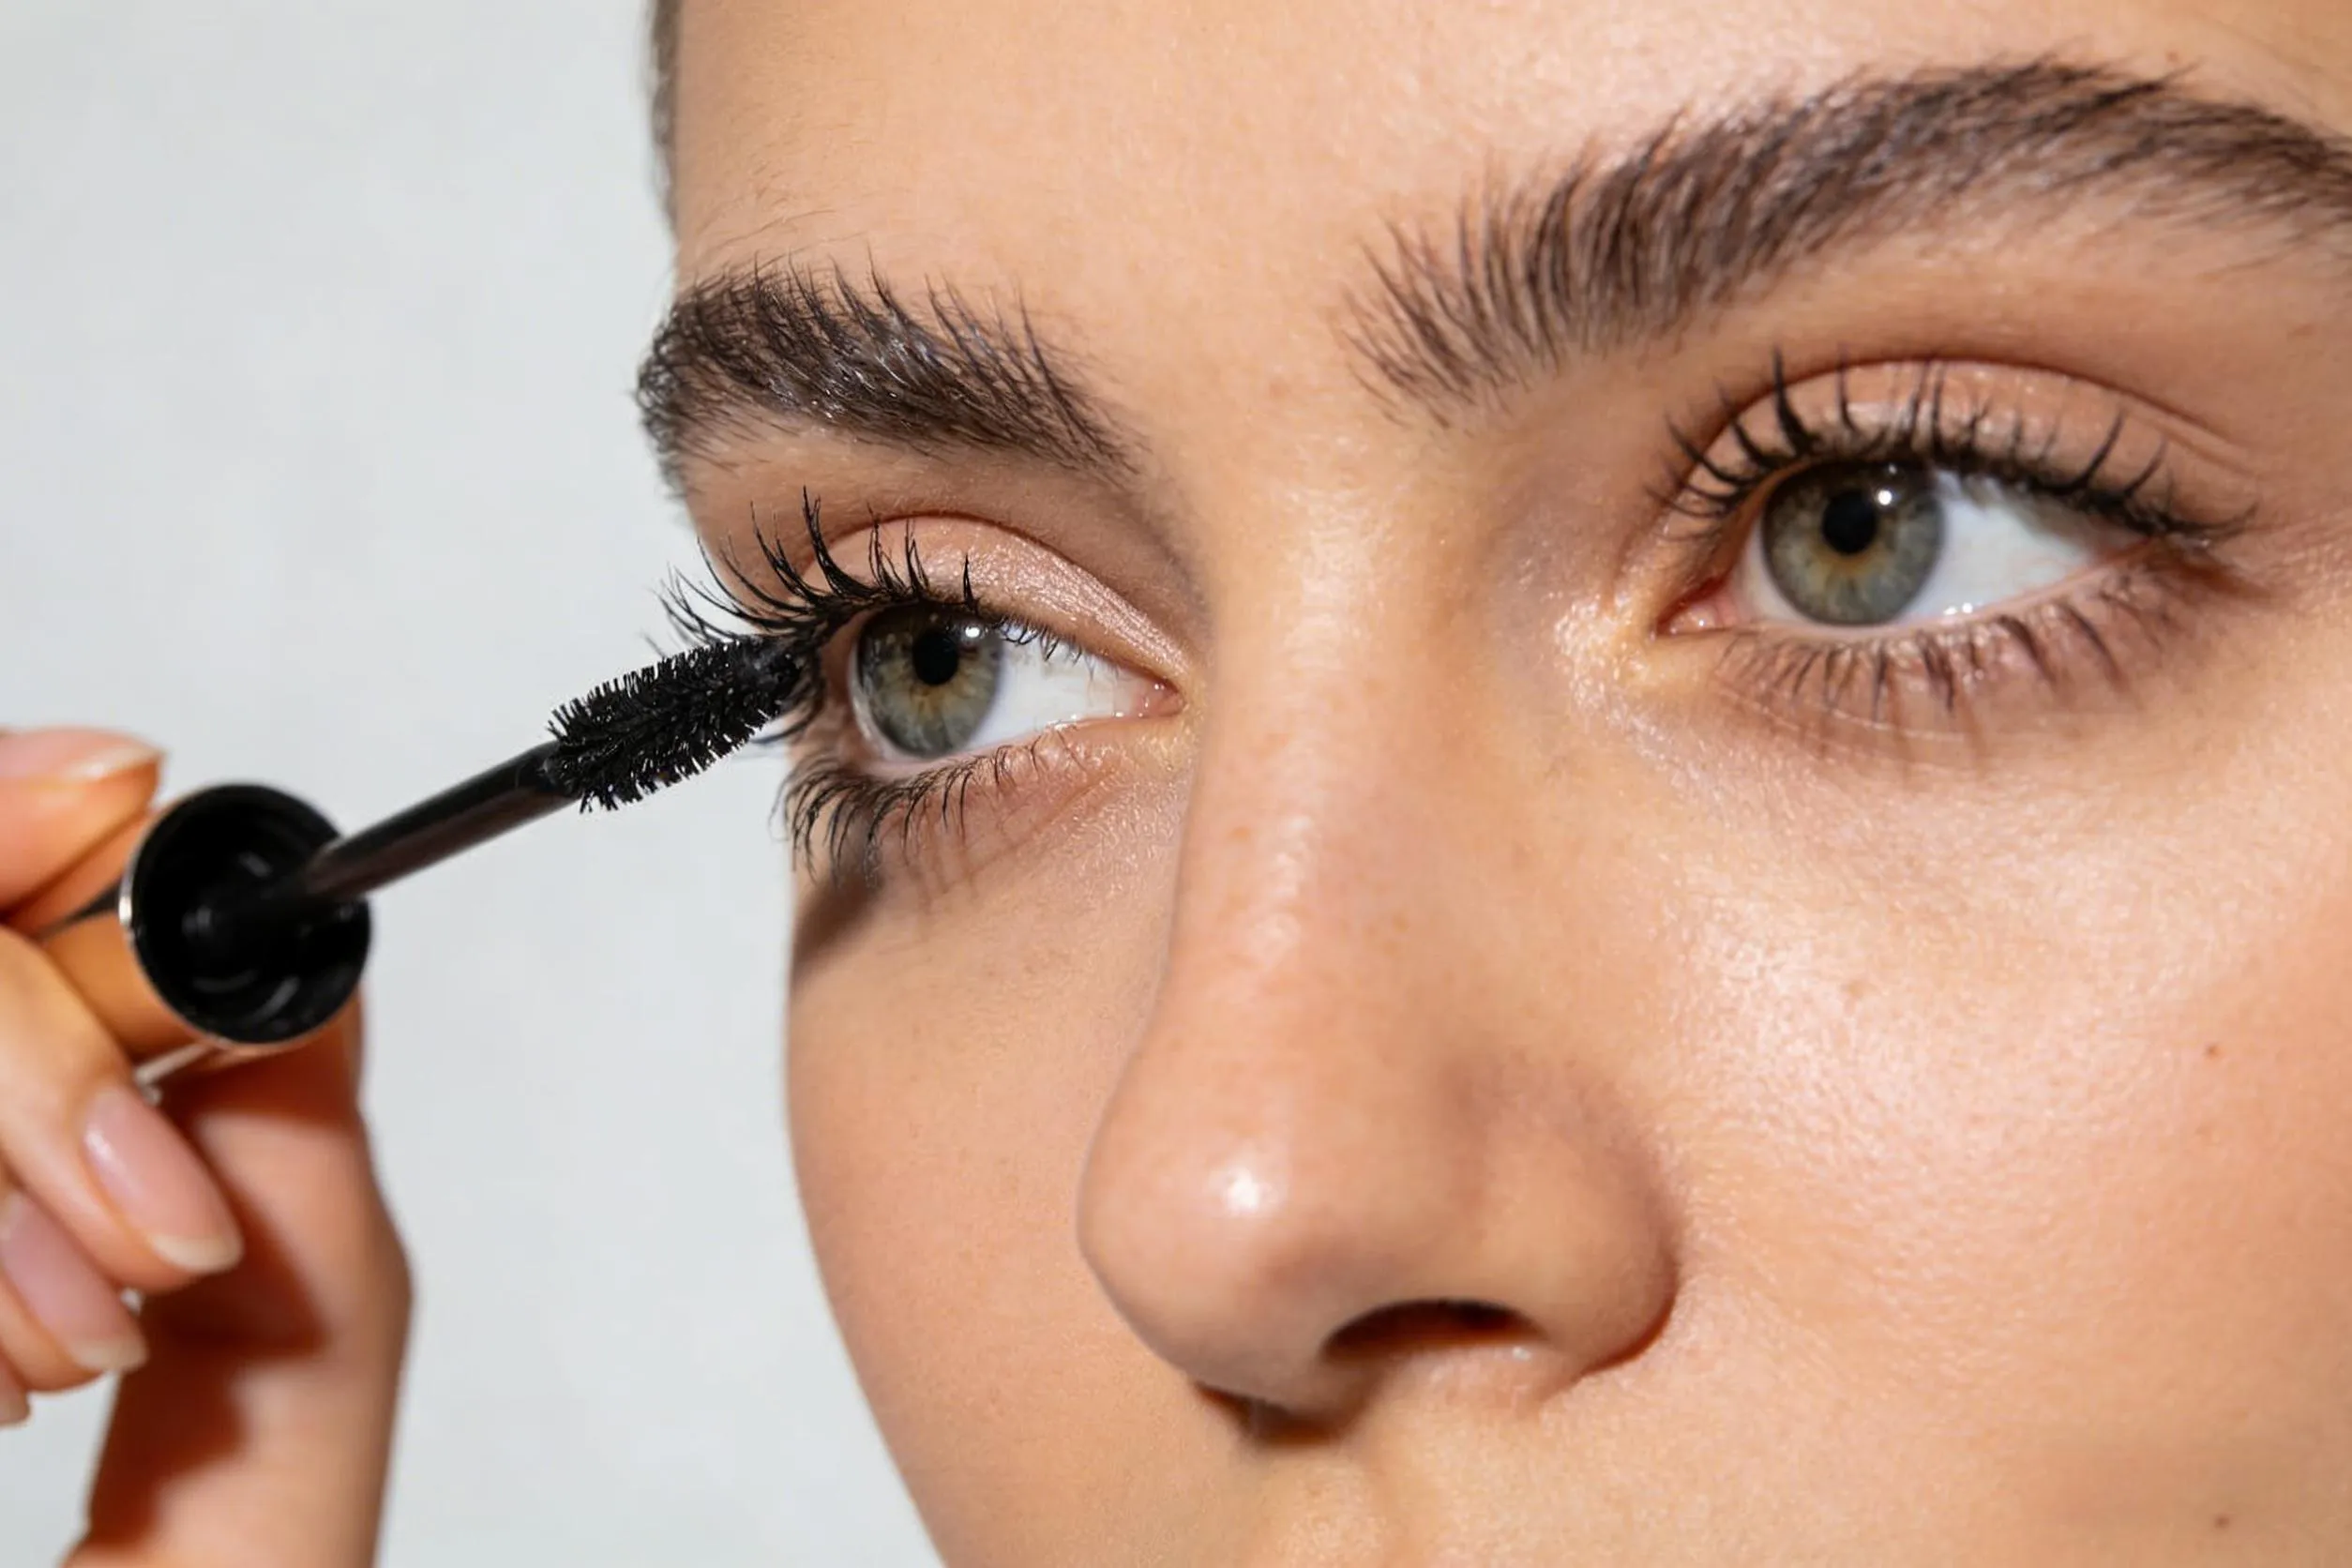
Now we get to the main event. Here is how to put on strip lashes for a natural look. We will break it down into simple, easy-to-follow steps.
The biggest mistake people make is using a lash strip that is too long. This is why the inner corner pokes your eye and the outer corner droops down, making your eyes look sad.
New lash bands are often stiff and straight. Your eye is curved. A stiff band is the main reason for lifting lash corners.
Too much glue is messy. Too little glue will not hold.
This is where you place the lash on your eye.
The final step is to make the two sets of lashes look like one.
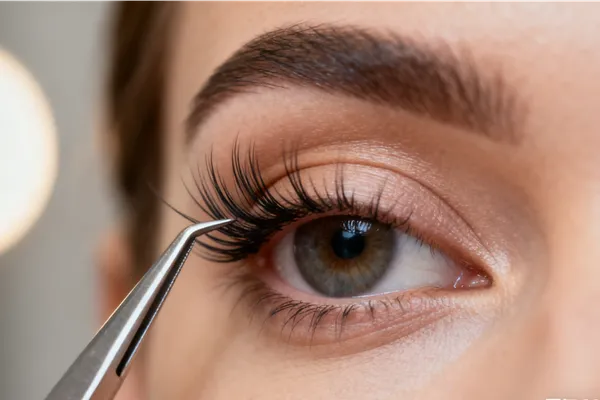
How to Apply Strip Lashes So They Look Natural
Not all lashes work for all eyes. The problem is that a lash style that looks great on one person can look strange on another. This can be very discouraging. You might think false lashes are not for you.
The solution is to understand your eye shape. Choosing lashes that flatter your unique eyes is how to choose false lashes for eye shape.
Learning how to wear false eyelashes everyday means avoiding common mistakes. Let’s look at the problems and their easy solutions.
You do not want to damage your real lashes. The fear of pulling out your own lashes is real. But false lashes without damaging real lashes is possible with proper care.
Good lashes can be used many times. This saves you money.
Your own lashes need care too.
This is often caused by three things: the lash band is too long and poking your eye, your eyes are watery, or there is oil on your skin. The fix is to trim the lash first. Then, make sure you apply a little extra glue to the inner corner and let it get extra tacky.
The secret is to use natural looking false eyelashes with a very thin or clear band. Place the band perfectly at your lash line. Then, pinch your real and false lashes together firmly. This will create a seamless blend.
Yes, if you are careful. Use a gentle, latex-free adhesive. Always remove them correctly without pulling. And clean your eyelids and natural lashes well. Giving your eyes a break one or two days a week is also a good idea.
Magnetic lashes vs glue is a big debate. Many beginners find magnetic lashes easier because there is no sticky glue. They can look natural, but the band on magnetic lashes can sometimes be thicker. It is a matter of personal choice.
For this look, you need the most subtle lashes possible. Choose very short, wispy lashes on a clear band. Or, use a few short individual cluster lashes on the outer corners of your eyes. The goal is to make people think you just have amazing natural lashes. A high-quality eyelash extensions kit can also provide the tools you need for a professional application at home.