تجنب تأخير الرد على استفسارك، يُرجى إدخال واتساب/سكايب الخاص بك مع الرسالة، حتى نتمكن من الاتصال بك في المرة الأولى.
سنرد عليك في غضون 24 ساعة. إذا كانت الحالة عاجلة، يرجى إضافة واتساب/وي تشات:
تحذير: متغير غير معرّف $public في /www/www/wwwroot/yuelinhenhengtong.hyhdemo.top/wp-content/themes/hyhadmin/header.php على الخط 313
تحذير: محاولة الوصول إلى إزاحة مصفوفة على قيمة من النوع الفارغ في /www/www/wwwroot/yuelinhenhengtong.hyhdemo.top/wp-content/themes/hyhadmin/header.php على الخط 313
,. أو اتصل بـ
تحذير: متغير غير معرّف $public في /www/www/wwwroot/yuelinhenhengtong.hyhdemo.top/wp-content/themes/hyhadmin/header.php على الخط 313
تحذير: محاولة الوصول إلى إزاحة مصفوفة على قيمة من النوع الفارغ في /www/www/wwwroot/yuelinhenhengtong.hyhdemo.top/wp-content/themes/hyhadmin/header.php على الخط 313
مباشرةً.
يمكن لصمغ الرموش الفوضوي والزوايا الملتوية والرموش التي تنفصل في منتصف النهار أن تفسد مزاجك بسرعة. إنه أمر مزعج ويجعلك تشعرين بأنك “لا تستطيعين عمل الرموش”. الخبر السار؟ باستخدام الطريقة الصحيحة، يمكن أن تكون مجموعات الرموش العنقودية روتينًا بسيطًا يمكن تكراره بنفسك ويبدو نظيفًا واحترافيًا.
نعم من السهل وضع الرموش العنقودية بمجرد أن تتعلمي وضع الرموش العنقودية وتوقيتها. مجموعة الرموش العنقودية عبارة عن مجموعة صغيرة من ألياف الرموش التي تقومين بتثبيتها على طول خط الرموش، وغالباً ما تكون تحت الرموش الطبيعية للحصول على لمسة نهائية ناعمة. باستخدام ملقط جيد، وطبقة رقيقة من الروابط، ودليل واضح خطوة بخطوة، يمكن لمعظم الناس وضع الرموش العنقودية في المنزل في غضون 10-20 دقيقة والحصول على مظهر بجودة الصالون دون الحاجة إلى مواعيد كاملة لتطويل الرموش.
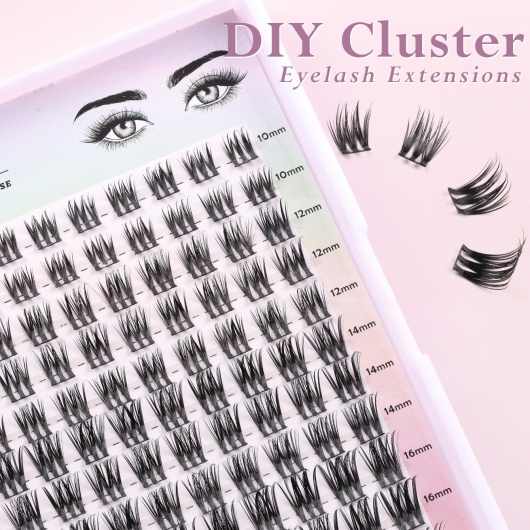
رموش عنقودية من الألياف الاصطناعية F21D 10-16 ملم
ما هي الرموش العنقودية، ولماذا هي أسهل من الرموش الفردية؟
هل الرموش العنقودية سهلة التطبيق بالنسبة للمبتدئين؟
إطالة الرموش بنفسك مقابل إطالة الرموش: ما الفرق في الوقت والتكلفة والمظهر؟
ما الأدوات التي تحتاجينها لوضع الرموش في المنزل؟
خطوة بخطوة: كيفية وضع الرموش العنقودية في المنزل (الطريقة السهلة)
أين يجب وضع مجموعة الرموش على خط الرموش (خريطة الرموش + شكل العين)؟
كم من الوقت تدوم الرموش العنقودية وكيف تجعلها تدوم طويلاً؟
الأخطاء الشائعة: سبب التواء العناقيد أو التصاقها أو الشعور بالالتواء (والإصلاحات)
كيفية إزالة الرموش العنقودية بأمان (مزيل الرموش + نصائح لإزالة الرموش)
الرموش العنقودية مقابل الرموش الشريطية 101: أيهما أفضل لروتينك الجمالي؟
A الرموش العنقودية هو بالضبط ما يبدو عليه الأمر: الرموش العنقودية عبارة عن مجموعات صغيرة من ألياف الرموش المجمعة معًا. تقومين بوضع كل قطعة من الرموش العنقودية على طول قاعدة رموشك الطبيعية للحصول على مظهر أكثر امتلاءً خطوة بخطوة.
فلماذا يجدها الكثيرون أسهل من الرموش المنفردة؟ لأنك تضعين عددًا أقل من القطع. يمكن لمجموعة واحدة أن تحل محل عدة وصلات فردية. وهذا يعني وقت أقل، وحركات صغيرة أقل، وتقدم أسرع للمبتدئين.
أيضًا، تم تصميم العديد من الرموش العنقودية المصممة على شكل مجموعات بحيث توضع تحت الرموش الطبيعية قليلاً بدلاً من وضعها في الأعلى مثل شريط الرموش الشريطية. يمكن أن يبدو هذا الموضع أكثر نعومة و“واقعية”، خاصةً عندما تبقي العناقيد بعيدًا عن خط الماء.
نعم - سهولة تطبيقها هي أحد أهم الأسباب التي تجعل عشاق الجمال يحبونها. ولكن إليكِ الحقيقة الصادقة: إنها سهلة بعد أن تتعلمي أمرين:
التوقيت (انتظر حتى تصبح الرابطة مبتذلة)
التنسيب (بالقرب من خط الرموش، ولكن ليس على بشرة الجفن)
إذا استعجلت، ينزلق العنقود. إذا وضعتِ الرموش بالقرب من خط الماء، ستشعرين بأنها مخدوشة. إذا استخدمتِ الكثير من الغراء، تتكتل الرموش وتبدو فوضوية.
فكر في الأمر وكأنه تعلم “لعبة رموش” جديدة. قد تكون محاولتك الأولى جيدة. ستكون محاولتك الثانية أفضل. وبحلول المحاولة الثالثة، ستشعرين على الأرجح أنه يمكنك تطبيقها بسهولة والحصول على لمسة نهائية نظيفة.
غالبًا ما يقارن الناس مجموعات الرموش المصنوعة يدويًا بمجموعة الرموش التي يتم تركيبها في الصالون. يمكن أن يبدو كلاهما جميلاً، لكنهما يخدمان احتياجات مختلفة.
إليك جدول مقارنة بسيط:
| الخيار | الأفضل لـ | الوقت | المهارة | انظري | الراحة |
|---|---|---|---|---|---|
| الرموش العنقودية (في المنزل) | بريق سريع في المنزل | 10-20 دقيقة | متوسط | قابل للبناء، طبيعي إلى جريء | مريحة عند وضعها بشكل صحيح |
| إطالة الرموش (صالون) | ارتداء طويل الأمد + تخصيص كامل | من ساعة إلى ساعتين | للمحترفين فقط | مصممة خصيصاً | مريحة للغاية عند القيام بها بشكل جيد |
| رموش مخططة | ارتداء لمرة واحدة | 3-10 دقائق | سهولة | جرأة فورية | يمكن الرفع عند الزوايا |
| رموش فردية (اصنعها بنفسك) | تعبئة دقيقة | 20-45 دقيقة | صعب | مفصلة للغاية | قد يكون الأمر صعباً |
إذا كنت ترغبين في الحصول على “رموش كالمحترفين” دون الحاجة إلى وقت في صالون التجميل، فإن هذه المجموعات هي الحل الأمثل. يمكنك الحصول على مظهر كامل دون الالتزام بخدمات إطالة الرموش الاحترافية.
لجعل تطبيق الرموش أكثر سلاسة، اجمعي مجموعة صغيرة. اجعليها بسيطة.
ملقط (المنحني مناسب للمبتدئين)
غراء الرموش أو نظام الربط (غراء الرموش المصنوع للعناقيد)
مرآة (أميليها حتى تتمكني من رؤية ما تحت رموشك)
بكرة نظيفة (للحفاظ على رموش نظيفة)
مزيل أو مزيل الرموش للإزالة الآمنة
مروحة صغيرة (تساعد على ضبط السندات)
منظف لطيف (للتحضير والعناية اللاحقة)
بطاقة خريطة الرموش (تساعدك على تخطيط الأطوال)
تذكير سريع: ابدئي برموش نظيفة. يقلل الزيت وبقايا المكياج من تماسك الرموش. هذه أسهل طريقة لتجنب رفع الرموش مبكرًا.
هذه هي الطريقة خطوة بخطوة التي أوصي بها للمبتدئين. إنه دليل حقيقي خطوة بخطوة يمكنك تكراره في كل مرة.
اغسلي منطقة الرموش وجففيها.
إذا كنتِ ترغبين في ذلك، قومي بتجعيد رموشكِ الطبيعية برفق.
تأكدي من عدم وجود زيت على خط الرموش.
استخدمي خريطة الرموش الأساسية: أقصر من الداخل وأطول من الخارج. معظم الناس يحبون عين القطة الناعمة: 8-10-12 ملم. إذا كنتِ تريدين رموشاً كثيفة، اجعليها أطول عند الزاوية الخارجية.
ابدئي بالماء هي قاعدة للعناية بالبشرة، ولكنها تعني هنا: ابدئي بقاعدة نظيفة.
ضع طبقة رقيقة - رقيقة جداً.
إذا كانت الروابط التي تستخدمينها ذات نمط صمغي، ضعي طبقة رقيقة على طول قاعدة الرموش وليس على الجلد.
أمسك العنقود بالقرب من القاعدة باستخدام الملقط.
لا تسحق الألياف. أمسكها برفق.
أبقيه قريباً من خط الماء ولكن دون أن يلامسه.
ضعي الرموش قليلاً تحت الرموش الطبيعية.
اضغطي برفق لمدة 2-3 ثوانٍ.
بعد وضع بضع عناقيد من الرموش، اضغطي على الرموش معًا برفق باستخدام الملقط أو الأصابع (كوني لطيفة).
يساعد ذلك على دمج المجموعة مع رموشك الطبيعية بحيث تبدو سلسة.
اعملي من الزاوية الوسطى إلى الزاوية الخارجية أولاً، ثم املئي الزاوية الداخلية في النهاية. إذا كانت الزاوية الداخلية صعبة، استخدمي مجموعات أقصر هناك.
نصيحة احترافية: إذا تحرك أحد العناقيد العنقودية، فلا داعي للذعر. انزع العناقيد برفق على الفور وأعد تركيبها. هذا أسهل بينما لا تزال الرابطة مرنة.
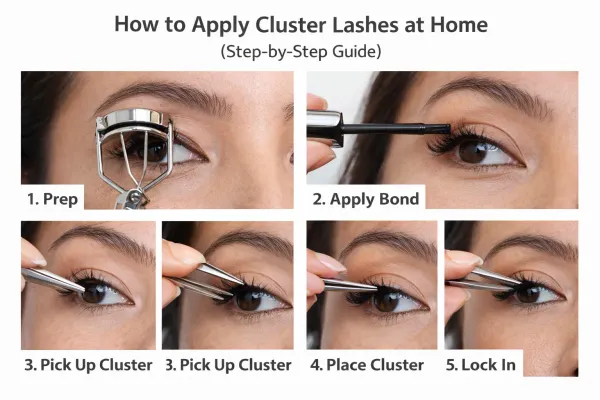
دليل الرموش العنقودية خطوة بخطوة لتطبيق الرموش العنقودية في المنزل
الموضع مهم أكثر مما يعتقد الناس. فهو يؤثر على الراحة والتناسق والأناقة.
ضعي العناقيد على قاعدة الرموش - وليس على بشرة الجفن.
أبعديهم عن خط الماء.
لا تزدحم الزاوية الداخلية.
العيون المستديرة: حافظي على الطول أكثر تساويًا، ولا تبالغي في تمديد الزاوية الخارجية.
العيون المقنّعة: ركز العناقيد على المركز لفتح العين.
العينان المقلوبتان: ارفعيها بعناقيد أطول قليلاً قبل الزاوية الخارجية.
إن خط الرموش النظيف هو سر الإطلالة المثالية للرموش. عندما تصطف القواعد، يرى الناس “طبيعية”. عندما تتقافز القواعد، يرى الناس “رموشاً اصطناعية”.”
إذن، هل تبقى الرموش العنقودية على الرموش العنقودية لفترة طويلة؟ يعتمد ذلك على نوع الرابطة وزيوت البشرة والعناية اللاحقة.
يمكن أن تدوم العديد من الأطقم المنزلية من أسبوع إلى أسبوعين باستخدام المنتجات المناسبة والعناية اللطيفة.
يفضل بعض الأشخاص 3-5 أيام للراحة وسهولة الإزالة.
إليك كيفية الحصول على رموش تدوم طويلاً:
تجنبي فرك عينيك.
أبعدي مزيل المكياج عن القاعدة قدر الإمكان.
نم على ظهرك إن استطعت.
استخدمي منظفًا لطيفًا حول منطقة العينين.
تعاملي مع الأمر وكأنه روتين تجميلي صغير - بسيط ولكن متناسق.
عند مزج أكثر من منتجين (مواد لاصقة وزيوت وبخاخات عشوائية مختلفة)، يمكن أن تنكسر الرابطة في وقت مبكر. التزم بنظام واحد.
إذا كنتِ ترغبين في الحصول على لمسة نهائية تدوم طويلاً، ضعي مجموعات من الرموش في مجموعات صغيرة من أقسام الرموش، وحافظي على التباعد بينها حتى لا تتجاذب. يساعدك ذلك على منعك من شد الرموش الطبيعية معًا بإحكام شديد عن طريق الخطأ.
من السهل إصلاح معظم “فشل التكتلات”. فيما يلي أهم المشكلات والحلول:
السبب: قريب جداً من خط الماء.
الإصلاح: قم بتحريك الكتلة لأعلى قليلاً (لا يزال بالقرب من قاعدة الرموش) وأعد الضغط.
السبب: الكثير من الغراء، أو وضعت على الجلد.
الإصلاح: استخدمي كمية أقل من السندات واربطيه بقاعدة الرموش فقط.
السبب: كثرة المنتج، أو تداخل المجموعات.
الإصلاح: استخدم طبقة رابطة أقل سمكاً وتباعد بين المجموعات بالتساوي.
السبب: الإمساك الخاطئ بالملقط أو التسرع في وضع الملقط.
الإصلاح: التقط المجموعة العنقودية من القاعدة وأمسكها بثبات أثناء الضغط.
السبب: عدم ضغط الرموش على بعضها البعض.
الإصلاح: بعد الاستعمال، اضغطي برفق حتى تلتصق المجموعة بالرموش الطبيعية.
هذه هي الطريقة التي تنتقل بها من “المظهر دون التزام” إلى “واو، هذا يبدو كمجموعة محترفين”.”
إزالة الرموش لا يقل أهمية عن وضعها. فالإزالة السيئة يمكن أن تتلف الرموش الطبيعية.
ضع مزيل أو مزيل زيتي موصى به لنظام الربط الخاص بك.
انتظر 30-60 ثانية حتى تتحلل المادة اللاصقة.
انزلق برفق من كل مجموعة - لا تسحبها.
نظّفي خط الرموش ورطّبي المنطقة.
استخدمي مزيل الرموش المناسب إذا كان الصمغ قويًا. إذا قمتِ بسحب الرموش، فقد تأخذين رموشاً طبيعية لإزالتها مع العنقود، وهذا ليس الهدف أبداً.
تذكير: إذا شعرتِ بتهيج في عينيكِ، توقفي وأزيليها. الراحة أولاً.
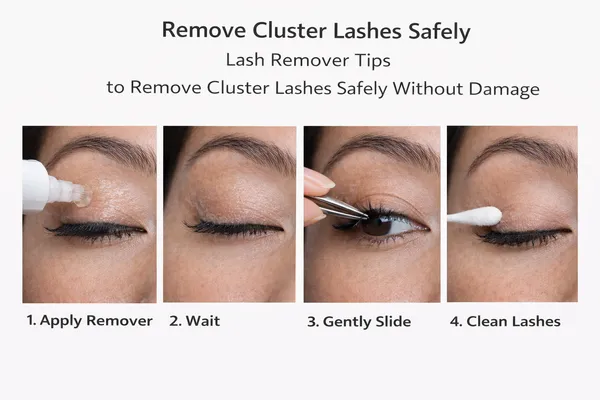
نصائح مزيل الرموش لإزالة الرموش العنقودية بأمان دون تلفها
إذا كنت تختار بين المجموعات والشرائط، فهذا الدليل السريع يساعدك.
مظهر مرن وقابل للبناء قاعدة رموش ناعمة ومرنة تبدو طبيعية أكثر
ارتداء في المنزل يمكن أن يدوم لعدة أيام
نهاية “استيقظت هكذا”
تألق فوري لحدث واحد
أسرع عملية لوضع الرموش
إزالة سهلة في اليوم نفسه
وبعبارة أخرى: الرموش الشريطية 101 تتعلق بالسرعة. أما الرموش العنقودية فتتعلق بالتحكم والراحة. كلاهما يعتبران رموشاً اصطناعية - لكنهما يخدمان أهدافاً مختلفة.
ملاحظة عن الاتجاه السائد: يرى الكثير من الناس مجموعات المجموعات العنقودية على tiktok ويعتقدون أنها “فورية”. إنها ليست فورية - لكنها قابلة للتعلم. بمجرد أن تتعلمي الروتين، ستصبح واحدة من أسهل الترقيات لإطلالتك الأسبوعية.
هل من السهل وضع الرموش العنقودية في المرة الأولى؟
قد تبدو صعبة في المحاولة الأولى، ولكن معظم المبتدئين يتحسنون بسرعة. اتبعي روتين خطوة بخطوة، واستخدمي الملقط، وأبقي العناقيد بعيدة عن خط الماء.
هل يمكنني وضع الرموش العنقودية في المنزل بدون خبرة؟
نعم. ابدئي بعناقيد أقصر وخريطة رموش بسيطة. استخدمي رابطة رقيقة وضعي كل مجموعة من الرموش بالقرب من قاعدة الرموش وليس على البشرة.
كم من الوقت تدوم الرموش العنقودية؟
تدوم مجموعات الرموش في أي مكان من بضعة أيام إلى حوالي أسبوع إلى أسبوعين تقريبًا حسب الرابطة وزيوت البشرة والعناية. يساعد التنظيف اللطيف وعدم الفرك في الحصول على مظهر يدوم طويلاً.
هل ستضر الرموش العنقودية برموشي الطبيعية؟
لا ينبغي - إذا قمت بإزالتها بشكل صحيح. استخدمي مزيل الرموش أو مزيل الرموش وانتظري ثم انزعيها برفق. قد يؤدي السحب إلى تلف الرموش الطبيعية.
هل الرموش العنقودية هي نفسها مجموعات تمديد الرموش؟
ليس بالضبط. يتم وضع وصلات الرموش في الصالون كوصلات فردية من قبل تقني مدرب. صُممت مجموعة الرموش العنقودية للاستخدام المنزلي السريع وسهولة الإزالة.
ما هي أسهل طريقة لجعلها تبدو طبيعية؟
استخدمي أطوالاً أقصر، وتجنبي وضع الرموش بالقرب من خط الماء، واضغطي على العناقيد بحيث تمتزج مع قاعدة رموشك الطبيعية.
تكون مجموعات الرموش العنقودية سهلة التطبيق بشكل عام بمجرد أن تتعلمي التوقيت والتنسيب.
استعملي طبقة رقيقة من الروابط، واستعملي ملقطًا جيدًا، وأبقي العناقيد بعيدًا عن بشرة الجفن وبعيدًا عن خط الماء.
تساعدك خريطة الرموش البسيطة على مطابقة شكل عينيك والحصول على خط رموش أنظف.
مع العناية المناسبة، يمكن أن تدوم العناقيد لفترة طويلة وتعطي مظهراً بجودة الصالون في المنزل.
إزالة الرموش بأمان: استخدمي مزيل/مزيل الرموش وانزليه برفق - لا تسحبيه أبداً.
بالنسبة للارتداء اليومي، غالبًا ما تبدو الرموش العنقودية طبيعية أكثر من الرموش الشريطية بينما تستغرق وقتًا أقل من مواعيد تمديد الرموش في الصالون.