Avoid your inquiry is delay response, please enter your WhatsApp/Skype along with the message, so we can contact you at the very first time.
We will reply you within 24 hours. If for urgent case, please add WhatsApp/WeChat:
Warning: Undefined variable $public in /www/wwwroot/yuelinhengtong.hyhdemo.top/wp-content/themes/hyhadmin/header.php on line 313
Warning: Trying to access array offset on value of type null in /www/wwwroot/yuelinhengtong.hyhdemo.top/wp-content/themes/hyhadmin/header.php on line 313
,. Or call
Warning: Undefined variable $public in /www/wwwroot/yuelinhengtong.hyhdemo.top/wp-content/themes/hyhadmin/header.php on line 313
Warning: Trying to access array offset on value of type null in /www/wwwroot/yuelinhengtong.hyhdemo.top/wp-content/themes/hyhadmin/header.php on line 313
directly.
Do you want beautiful, long eyelashes? Of course, you do. But getting them is a problem. Going to a salon for professional eyelash extensions is very expensive. It can cost hundreds of dollars. It also takes a lot of time. You have to lie still for hours.
This is a big frustration. You want to look your best. You see beautiful lashes on social media stars like Huda Kattan and in videos by NikkieTutorials. You try using mascara, but it is not enough. You try strip lashes, but they can look fake. They can feel heavy. Sometimes, one side comes off. It is embarrassing. You feel stuck. You want a better way to get the lashes you dream of.
There is a solution. It is simple. It is affordable. You can do it at home. It is called DIY lash extensions using individual cluster lashes. This guide will show you exactly how to do it. We will make it easy. We will show you the science behind a perfect application. You will learn how to get a natural look cluster lashes style or a bold, dramatic lashes look. It is all up to you.
Starting a new beauty routine can feel like a problem. What do you need to buy? There are so many lash products at Sephora and Ulta Beauty. It is easy to feel confused. You might worry about buying the wrong thing or wasting money.
This is agitating. You just want to start. You do not want to spend a week researching tools. You do not want a drawer full of things you will never use.
The solution is to keep it simple. You only need a few key items. A good manufacturer, especially one with years of experience supplying brands in Europe and North America, knows how to create a perfect eyelash cluster kit. These kits have everything you need.
Here is your simple toolkit:
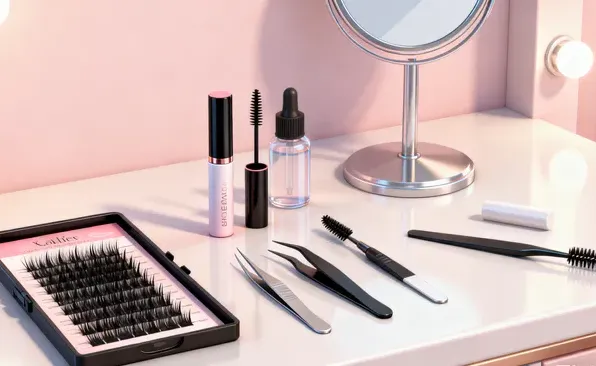
Cluster Lash Toolkit
You are not alone in seeking a better lash solution. Market data shows a huge shift towards at-home beauty.
| Data Point | Statistic / Finding | What This Means For You |
| Market Growth | The false eyelashes market is growing to ~$2.8 billion by 2030. The DIY part is growing the fastest. | More people are choosing at-home lashes. This means better products and more tutorials are available for you. |
| Search Interest | Google searches for “DIY lash extensions” are up 150% in the last 3 years. | You are part of a big trend. People want to learn this skill, and this guide will teach you. |
| Social Media Impact | The hashtag #diylashes has over 1.2 billion views on TikTok. | There is a huge community of people sharing tips. You can find endless inspiration for your lash map. |
| Key Motivator | A survey showed cost-saving is the #1 reason for choosing at-home beauty. | You will save a lot of money compared to salon lash extensions. |
Have you ever had your lashes fall off too soon? This is a common problem. It is very disappointing. You spend time applying your lashes. You want them to last. When they do not, you feel like you wasted your time and money.
The solution is in the prep. Just like painting a wall, you need a clean surface. Your natural lashes must be perfectly clean. This is the most important step for making your cluster lashes extensions last.
The application can seem like the biggest problem. You might be worried. “What if I poke my eye?” “What if they look crooked?” These are normal fears. It can be agitating to see a tiny lash cluster on the end of a tweezer and wonder how you will get it in the right spot.
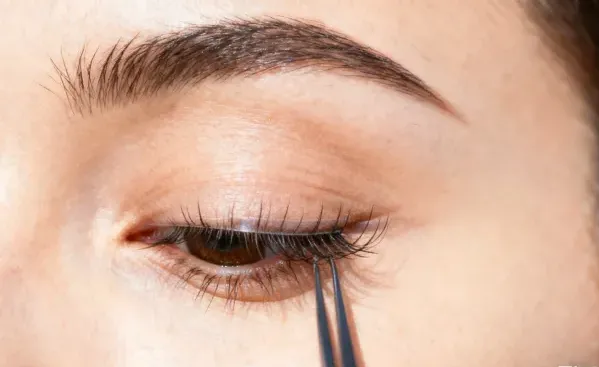
The solution is a simple, proven method. It is called the under-lash application technique. You apply the lashes to the underside of your natural lashes. This has two big benefits:
Let’s break it down into tiny, easy steps.
Think of this like a mascara. Take the “bond” applicator. Wipe off any extra product. Apply a thin layer to the base of your upper natural lashes. Focus on the bottom 1-2 millimeters of your lashes. You do not need to coat the whole lash.
It is best to start from the outer corner of your eye and work your way in.
Take your next cluster. Place it right next to the first one. You can overlap them just a tiny bit. This creates a seamless, full look. Keep going until you reach the inner corner of your eye.

Applying the Cluster Lashes
This is the fun part. The problem with strip lashes is they are one-size-fits-all. But not all eyes are the same shape. The solution is a custom lash map. You use different lengths of clusters to create a style that is perfect for you.
A reliable supplier is key to customization. A company with a strong supply chain and OEM/ODM services can create any style you can imagine, from natural wispy lashes to bold pink eyelashes or even bottom lashes.
Even with a guide, you might face a problem. Your first try might be tricky. This can be agitating. But do not give up! Data from thousands of user reviews shows what problems are most common. The solution is to learn from them.
| Challenge Area | Common User-Reported Problem | What This Means | How You Can Solve It |
| Longevity | “My lashes are falling off in 2-3 days.” | ~45% of negative reviews talk about this. | Be extra careful with your lash prep. Make sure your lashes are 100% clean and oil-free. And do not skip the “seal” step! |
| Placement | “They look clumpy or crooked.” | This is the #1 frustration for beginners. | Go slow. Use a lash map. And remember to place the lash 1-2mm away from your skin. Good lash tweezers are a must. |
| Comfort & Safety | “My eyes feel irritated.” | ~20% of users worry about this. | The irritation is almost always from placing the lash too close to the skin. Keep that small gap. Also, do a patch test for the lash glue. |
| Removal | “I pulled out my natural lashes.” | This is a big fear. | Never, ever pull the lashes off. Be patient. Use a good lash remover. It will dissolve the glue so they slide off gently. |
| Learning Curve | “My first try took over an hour.” | This is normal. | Your first time is for practice. By your third try, you will be much faster. Be patient with yourself. A good lash clusters kit can make the learning process much smoother. |
You have applied all your lashes. They look great. But there is one last problem to solve. How do you make them last? It would be so frustrating to have them look perfect, only for them to move or fall off a day later.
The solution is the final, most important step: sealing.
Your lashes are on. They look amazing. Now, the problem is keeping them that way. It is also important to know how to remove them safely. It is agitating to think you might damage your natural lashes. The health of your natural lash health is number one.
The solution is a simple care and removal routine.
Sealing Your Lashes for All-Day Wear
Q1: How long do cluster lashes last?
With proper application and aftercare, they can last 5-7 days, sometimes even longer.
Q2: Can you reuse cluster lashes?
It is possible, but they need to be cleaned very carefully. For the best, freshest look, it is recommended to use a new set each time. High-quality manufacturing allows for affordable, high-end lashes, so you can always have a perfect set ready.
Q3: Are cluster lashes damaging to your natural lashes?
No, not if you apply and remove them correctly. The damage comes from pulling them off, not from wearing them. The key is a gentle removal process.
Q4: Can you shower with cluster lashes?
Yes, after the first 24-48 hours. Try not to let the hot water spray directly on them for a long time. When you dry your face, gently pat your eyes dry.
By choosing quality products from a dedicated eyelash supplier and following these scientific steps, you can solve the problem of getting beautiful lashes. You can avoid the frustration and high cost of salons and achieve a flawless, custom look right at home. It just takes a little practice. You can do it.