تجنب تأخير الرد على استفسارك، يُرجى إدخال واتساب/سكايب الخاص بك مع الرسالة، حتى نتمكن من الاتصال بك في المرة الأولى.
سنرد عليك في غضون 24 ساعة. إذا كانت الحالة عاجلة، يرجى إضافة واتساب/وي تشات:
تحذير: متغير غير معرّف $public في /www/www/wwwroot/yuelinhenhengtong.hyhdemo.top/wp-content/themes/hyhadmin/header.php على الخط 313
تحذير: محاولة الوصول إلى إزاحة مصفوفة على قيمة من النوع الفارغ في /www/www/wwwroot/yuelinhenhengtong.hyhdemo.top/wp-content/themes/hyhadmin/header.php على الخط 313
,. أو اتصل بـ
تحذير: متغير غير معرّف $public في /www/www/wwwroot/yuelinhenhengtong.hyhdemo.top/wp-content/themes/hyhadmin/header.php على الخط 313
تحذير: محاولة الوصول إلى إزاحة مصفوفة على قيمة من النوع الفارغ في /www/www/wwwroot/yuelinhenhengtong.hyhdemo.top/wp-content/themes/hyhadmin/header.php على الخط 313
مباشرةً.
هل تريدين رموشاً طويلة وجميلة؟ بالطبع تريدين ذلك. لكن الحصول عليها هو المشكلة. الذهاب إلى صالون لـ وصلات الرموش الاحترافية مكلف للغاية. يمكن أن يكلف مئات الدولارات. كما أنها تستغرق الكثير من الوقت. عليك الاستلقاء لساعات.
هذا أمر كبير الإحباط. تريدين أن تبدين في أفضل حالاتك. تشاهدين رموشاً جميلة على نجمات وسائل التواصل الاجتماعي مثل هدى قطان وفي فيديوهات NikkieTutorials. تحاولين استخدام الماسكارا، لكنها ليست كافية. تحاولين رموش شريطيةولكن يمكن أن تبدو مزيفة. يمكن أن تبدو ثقيلة. في بعض الأحيان، ينفصل أحد الجانبين. إنه أمر محرج. تشعرين بأنك عالقة. تريدين طريقة أفضل للحصول على الرموش التي تحلمين بها.
يوجد الحل. الأمر بسيط. وبأسعار معقولة. يمكنك القيام به في المنزل. ويطلق عليه وصلات الرموش التي تصنعها بنفسك باستخدام رموش عنقودية فردية. سيوضح لك هذا الدليل كيفية القيام بذلك بالضبط. سنجعل الأمر سهلاً. سنوضح لك العلم وراء التطبيق المثالي. سوف تتعلم كيفية الحصول على رموش عنقودية ذات مظهر طبيعي النمط أو الجريء, رموش درامية انظري. الأمر كله متروك لك.
قد يبدو بدء روتين تجميل جديد وكأنه المشكلة. ما الذي تحتاج إلى شرائه؟ هناك الكثير من منتجات الرموش في سيفورا وأولتا بيوتي. من السهل أن تشعر بالارتباك. قد تقلقين من شراء الشيء الخطأ أو إهدار المال.
هذا هو التحريض. أنت تريد فقط أن تبدأ. لا تريد قضاء أسبوع في البحث عن الأدوات. لا تريد درجًا مليئًا بالأشياء التي لن تستخدمها أبدًا.
إن الحل هو أن تبقي الأمر بسيطاً. أنت تحتاج فقط إلى عدد قليل من العناصر الرئيسية. تعرف الشركة المصنعة الجيدة، خاصة تلك التي تتمتع بسنوات من الخبرة في توريد العلامات التجارية في أوروبا وأمريكا الشمالية، كيفية إنشاء طقم مجموعة الرموش العنقودية. تحتوي هذه الأطقم على كل ما تحتاجه.
إليك مجموعة أدواتك البسيطة:

مجموعة أدوات الرموش العنقودية
لستِ وحدك في البحث عن حل أفضل للرموش. تُظهر بيانات السوق تحولاً كبيراً نحو الجمال المنزلي.
| نقطة البيانات | الإحصائية / النتيجة | ما الذي يعنيه ذلك بالنسبة لك |
| نمو السوق | ينمو سوق الرموش الاصطناعية إلى حوالي $2.8 مليار بحلول عام 2030. ينمو الجزء الخاص بالأنشطة اليدوية بشكل أسرع. | يختار المزيد من الأشخاص الرموش المنزلية. وهذا يعني توفر منتجات أفضل والمزيد من الدروس التعليمية لك. |
| بحث الفائدة | ترتفع عمليات البحث على جوجل عن "وصلات الرموش التي تصنعها بنفسك" 150% في آخر 3 سنوات | أنت جزء من اتجاه كبير. يرغب الناس في تعلم هذه المهارة، وسيعلمك هذا الدليل. |
| تأثير وسائل التواصل الاجتماعي | يحتوي هاشتاج #diylashes على أكثر من 1.2 مليار مشاهدة على تيك توك | هناك مجتمع ضخم من الأشخاص الذين يتشاركون النصائح. يمكنك العثور على إلهام لا نهاية له لخريطة رموشك. |
| المحفز الرئيسي | أظهر استطلاع رأي توفير التكاليف هو السبب #1 لاختيار التجميل في المنزل. | سوف توفر الكثير من المال مقارنةً بالصالون وصلات الرموش. |
هل سبق لكِ أن تعرضتِ لسقوط رموشكِ مبكراً؟ هذا أمر شائع المشكلة. إنه مخيبة للآمال. تقضين وقتاً طويلاً في وضع رموشك. وتريدينها أن تدوم. وعندما لا تدوم، تشعرين بأنك أهدرتِ وقتك ومالك.
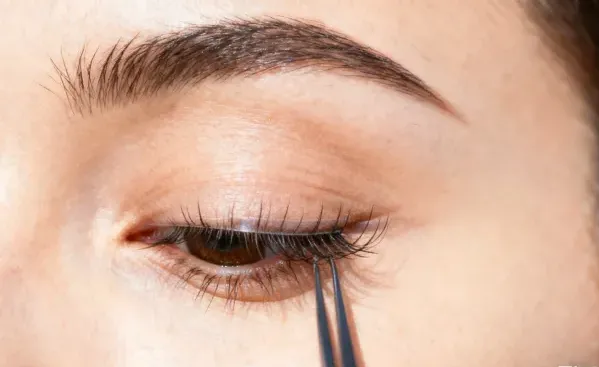
إن الحل في الإعداد. تماماً مثل طلاء الجدار، تحتاجين إلى سطح نظيف. يجب أن تكون رموشك الطبيعية نظيفة تماماً. هذه هي الخطوة الأكثر أهمية لجعل وصلات الرموش العنقودية الأخير.
يمكن أن يبدو التطبيق وكأنه أكبر المشكلة. قد تشعر بالقلق. "ماذا لو فقأت عيني؟" "ماذا لو بدت ملتوية؟" هذه مخاوف طبيعية. يمكن أن تكون التحريض أن ترى مجموعة رموش صغيرة على طرف الملقط وتتساءل كيف ستضعها في المكان الصحيح.
إن الحل طريقة بسيطة ومجربة. ويطلق عليها تقنية وضع الرموش تحت الرموش. تضعين الرموش على الجانب السفلي رموشكِ الطبيعية. وهذا له فائدتان كبيرتان:
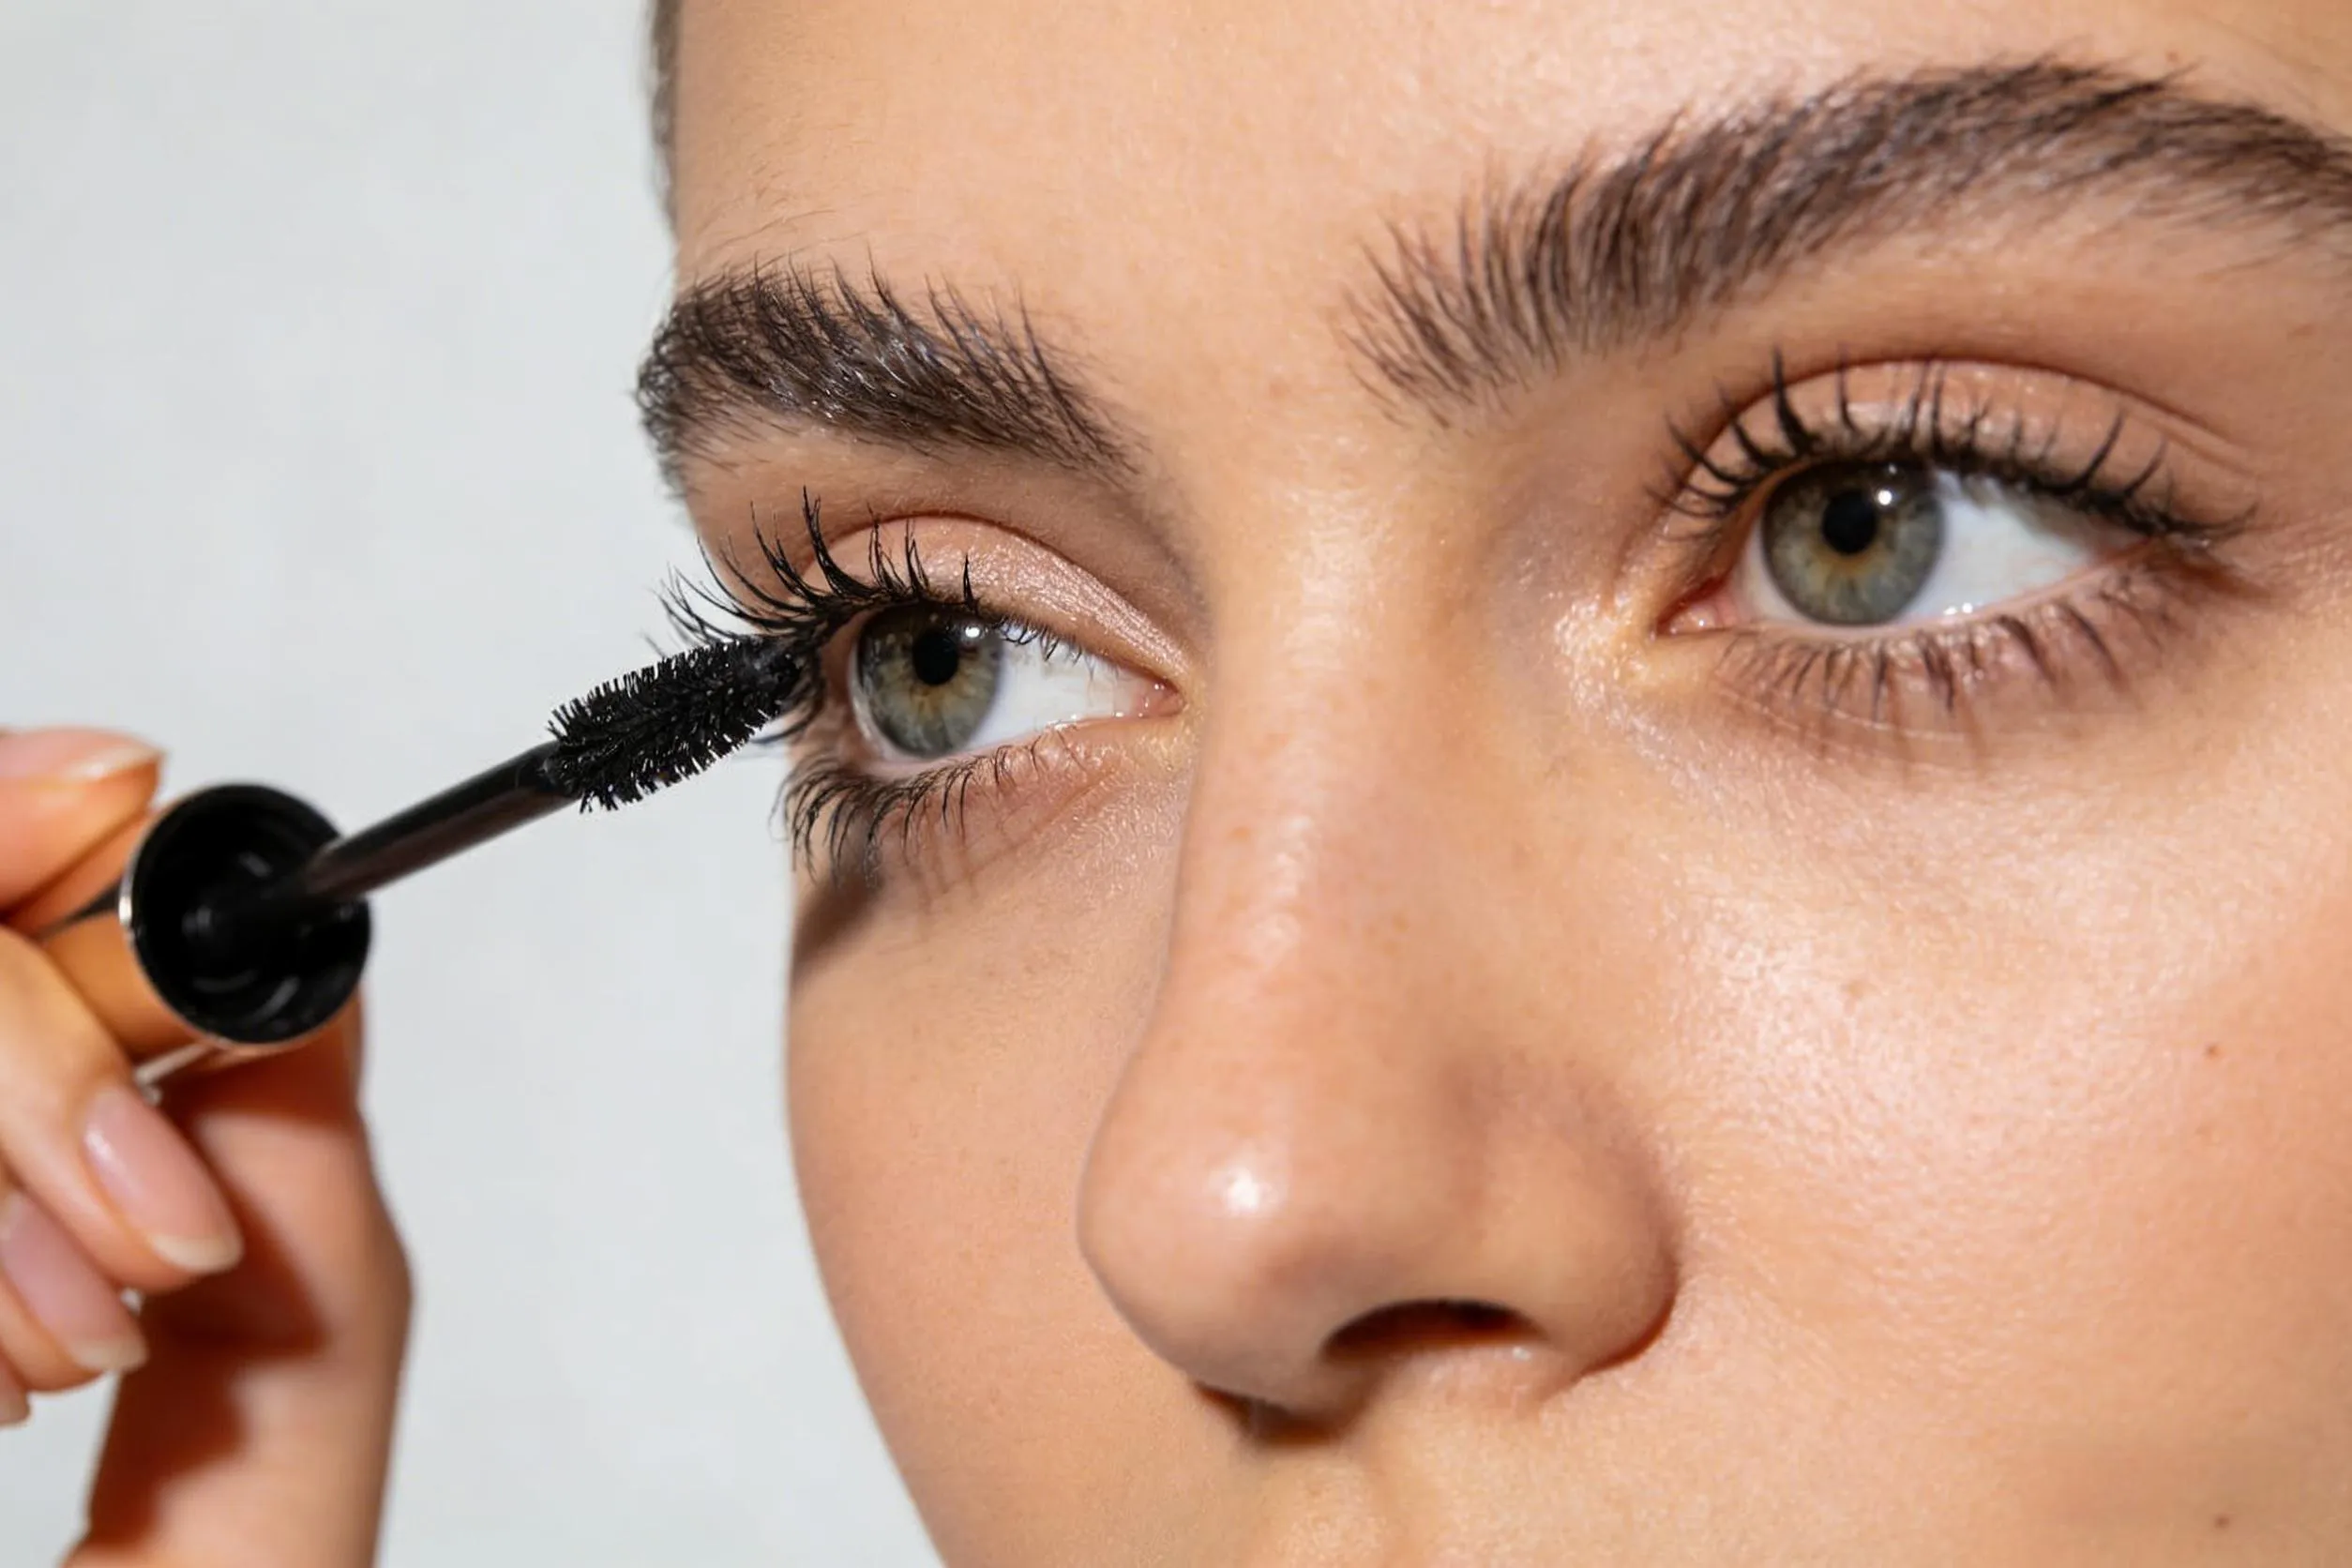
دعنا نقسمها إلى خطوات صغيرة وسهلة.
فكري في هذا الأمر مثل الماسكارا. خذي أداة وضع "بوند". امسحي أي منتج إضافي. ضعي طبقة رقيقة على قاعدة رموشك الطبيعية العلوية. ركزي على الجزء السفلي 1-2 ملليمتر من رموشك. لا تحتاجين إلى تغطية الرموش بالكامل.
من الأفضل أن تبدأ من الزاوية الخارجية للعين وتتجه إلى الداخل.
خذ المجموعة التالية. ضعها بجوار المجموعة الأولى مباشرةً. يمكنك تداخلها قليلاً. هذا يخلق مظهرًا سلسًا وممتلئًا. استمر حتى تصل إلى الزاوية الداخلية للعين.

وضع الرموش العنقودية
هذا هو الجزء الممتع. هذا هو الجزء الممتع المشكلة مع الرموش الشريطية هي أنها ذات مقاس واحد يناسب الجميع. ولكن ليست كل العيون بنفس الشكل. إن الحل مخصص خريطة الرموش. يمكنك استخدام أطوال مختلفة من العناقيد لابتكار النمط المثالي لك.
المورد الموثوق به هو مفتاح التخصيص. فالشركة التي لديها سلسلة توريد قوية وخدمات تصنيع المعدات الأصلية/التصنيع حسب الطلب يمكنها ابتكار أي نمط يمكنك تخيله، من رموش ناعمة طبيعية بالخط العريض الرموش الوردية أو حتى الرموش السفلية.
حتى مع وجود دليل، قد تواجه المشكلة. قد تكون المحاولة الأولى صعبة. يمكن أن يكون هذا التحريض. لكن لا تستسلم! تُظهر البيانات المستقاة من آلاف المراجعات من المستخدمين المشاكل الأكثر شيوعاً. إن الحل هو التعلم منهم.
| منطقة التحدي | المشكلة الشائعة التي أبلغ عنها المستخدم | ما يعنيه ذلك | كيف يمكنك حلها |
| طول العمر | "تتساقط رموشي خلال يومين أو ثلاثة أيام." | ~حوالي 45% من المراجعات السلبية تتحدث عن هذا الأمر. | كن أكثر حذراً مع إعداد الرموش. احرصي على أن تكون رموشك نظيفة وخالية من الزيوت. ولا تتخطي خطوة "الختم"! |
| التنسيب | "تبدو متكتلة أو ملتوية." | هذا هو الإحباط #1 للمبتدئين. | تمهّل. استخدمي خريطة الرموش. وتذكر أن تضع الرموش 1-2 مم من بشرتك. جيد ملاقط الرموش ضرورية. |
| الراحة والأمان | "أشعر بتهيج في عينيّ." | ~حوالي 20% من المستخدمين قلقون بشأن هذا الأمر. | يكون التهيج دائمًا بسبب وضع الرموش قريبًا جدًا من الجلد. حافظي على تلك الفجوة الصغيرة. وأيضًا، قومي بـ اختبار الرقعة لغراء الرموش |
| الإزالة | "لقد سحبت رموشي الطبيعية." | هذا خوف كبير. | لا تسحبي الرموش أبداً. كوني صبورة. استخدمي مزيل رموش جيد. سيذيب الغراء حتى تنزلق الرموش بلطف. |
| منحنى التعلم | "استغرقت محاولتي الأولى أكثر من ساعة." | هذا أمر طبيعي. | المرة الأولى هي للتدرب. بحلول محاولتك الثالثة، ستكون أسرع بكثير. كن صبوراً مع نفسك. جيد طقم مجموعات الرموش يمكن أن يجعل عملية التعلم أكثر سلاسة. |
لقد وضعتِ كل رموشكِ. تبدو رائعة. ولكن هناك واحدة أخيرة المشكلة لحلها. كيف تجعلها تدوم؟ سيكون الأمر كذلك محبط أن تبدو مثالية، إلا أنها تتحرك أو تسقط بعد يوم واحد.
إن الحل هي الخطوة الأخيرة والأكثر أهمية: الختم.
رموشكِ جاهزة. تبدو رائعة. والآن، فإن المشكلة هو إبقائها على هذا النحو. ومن المهم أيضاً معرفة كيفية إزالتها بأمان. إنه التحريض التفكير في أنك قد تتلفين رموشك الطبيعية. صحة صحة الرموش الطبيعية رقم واحد
إن الحل هو روتين عناية وإزالة بسيط.
إحكام إغلاق رموشكِ طوال اليوم
س1: ما هي مدة بقاء الرموش العنقودية؟
مع الاستخدام المناسب والعناية اللاحقة، يمكن أن تدوم من 5 إلى 7 أيام، وأحياناً أكثر من ذلك.
س2: هل يمكنك إعادة استخدام الرموش العنقودية؟
هذا ممكن، ولكن يجب تنظيفها بعناية فائقة. وللحصول على أفضل إطلالة جديدة ونضرة، يوصى باستخدام مجموعة جديدة في كل مرة. يتيح لك التصنيع عالي الجودة الحصول على رموش عالية الجودة وبأسعار معقولة، بحيث يمكنك دائمًا الحصول على مجموعة مثالية جاهزة.
س3: هل تضر الرموش العنقودية برموشك الطبيعية؟
لا، ليس إذا قمت بوضعها وإزالتها بشكل صحيح. يأتي الضرر من نزعها وليس من ارتدائها. المفتاح هو عملية إزالة لطيفة.
س4: هل يمكنك الاستحمام بالرموش العنقودية؟
نعم، بعد أول 24-48 ساعة. حاولي ألا تدعي الماء الساخن يرش عليها مباشرة لفترة طويلة. عندما تجففي وجهك، جففي عينيك برفق.
من خلال اختيار منتجات عالية الجودة من مورد مخصص للرموش واتباع هذه الخطوات العلمية، يمكنك حل مشكلة الحصول على رموش جميلة. يمكنك تجنب الإحباط والتكلفة المرتفعة لصالونات التجميل والحصول على مظهر مخصص لا تشوبه شائبة في المنزل. لا يتطلب الأمر سوى القليل من الممارسة. يمكنك القيام بذلك.