Si votre demande n'est pas traitée dans les plus brefs délais, veuillez indiquer votre adresse WhatsApp/Skype dans le message, afin que nous puissions vous contacter dès la première fois.
Nous vous répondrons dans les 24 heures. En cas d'urgence, veuillez ajouter WhatsApp/WeChat :
Avertissement: Variable non définie $public dans /www/wwwroot/yuelinhengtong.hyhdemo.top/wp-content/themes/hyhadmin/header.php en ligne 313
Avertissement: Essai d'accès à un offset de tableau sur une valeur de type null en /www/wwwroot/yuelinhengtong.hyhdemo.top/wp-content/themes/hyhadmin/header.php en ligne 313
,. Ou appelez le
Avertissement: Variable non définie $public dans /www/wwwroot/yuelinhengtong.hyhdemo.top/wp-content/themes/hyhadmin/header.php en ligne 313
Avertissement: Essai d'accès à un offset de tableau sur une valeur de type null en /www/wwwroot/yuelinhengtong.hyhdemo.top/wp-content/themes/hyhadmin/header.php en ligne 313
directement.
Vous voulez de beaux et longs cils ? Bien sûr que oui. Mais les obtenir est un problème. Aller dans un salon de coiffure pour extensions de cils professionnelles est très coûteux. Elle peut coûter des centaines de dollars. Elle prend également beaucoup de temps. Il faut rester allongé pendant des heures.
Il s'agit d'une grande frustration. Vous voulez être à votre avantage. Vous voyez de magnifiques cils sur les réseaux sociaux, chez des stars comme Huda Kattan et dans les vidéos de NikkieTutorials. Vous essayez d'utiliser du mascara, mais cela ne suffit pas. Vous essayez bandes de cilsIls peuvent avoir l'air faux. Ils peuvent sembler lourds. Parfois, un côté se détache. C'est gênant. Vous vous sentez coincée. Vous voulez un meilleur moyen d'obtenir les cils dont vous rêvez.
Il existe un solution. C'est simple. C'est abordable. Vous pouvez le faire chez vous. Elle s'appelle Extensions de cils DIY en utilisant cils individuels en grappe. Ce guide vous montrera exactement comment procéder. Nous vous faciliterons la tâche. Nous vous montrerons les principes scientifiques qui sous-tendent une demande parfaite. Vous apprendrez comment obtenir un cils en grappe à l'aspect naturel ou en gras, des cils spectaculaires regarder. Tout dépend de vous.
Commencer une nouvelle routine de beauté peut ressembler à une problème. Que faut-il acheter ? Il y a tant de produits pour cils chez Sephora et Ulta Beauty. Il est facile de se sentir perdu. Vous pouvez craindre d'acheter la mauvaise chose ou de gaspiller de l'argent.
Il s'agit de agitation. Vous voulez simplement commencer. Vous ne voulez pas passer une semaine à rechercher des outils. Vous ne voulez pas d'un tiroir rempli de choses que vous n'utiliserez jamais.
Les solution est de rester simple. Vous n'avez besoin que de quelques éléments clés. Un bon fabricant, surtout s'il a des années d'expérience dans la fourniture de marques en Europe et en Amérique du Nord, sait comment créer un produit parfait. kit pour faisceau de cils. Ces kits contiennent tout ce dont vous avez besoin.
Voici votre boîte à outils simple :
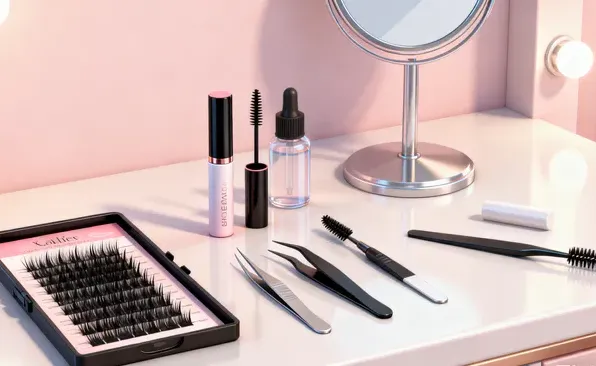
Boîte à outils pour les cils en grappe
Vous n'êtes pas la seule à chercher une meilleure solution pour les cils. Les données du marché montrent une évolution considérable vers la beauté à domicile.
| Point de données | Statistique / Constat | Ce que cela signifie pour vous |
| Croissance du marché | Le marché des faux cils atteindra ~$2,8 milliards d'euros d'ici 2030. C'est le secteur du bricolage qui connaît la croissance la plus rapide. | De plus en plus de personnes choisissent de se faire des cils à la maison. Cela signifie que de meilleurs produits et davantage de tutoriels sont disponibles pour vous. |
| Intérêt de la recherche | Les recherches sur Google pour "DIY lash extensions" sont en hausse 150% au cours des trois dernières années. | Vous faites partie d'une grande tendance. Les gens veulent apprendre cette compétence, et ce guide vous l'apprendra. |
| Impact des médias sociaux | Le hashtag #diylashes a plus de 1,2 milliard de vues sur TikTok. | Il existe une vaste communauté de personnes qui partagent leurs conseils. Vous pouvez y trouver une source d'inspiration inépuisable pour votre carte des cils. |
| Motivateur principal | Une enquête a montré que réduction des coûts est la #1 raison de choisir la beauté à domicile. | Vous économiserez beaucoup d'argent par rapport aux salons de coiffure. extensions de cils. |
Vous est-il déjà arrivé que vos cils tombent trop tôt ? Il s'agit d'une problème. Il est très décevant. Vous passez du temps à appliquer vos cils. Vous voulez qu'ils durent. Si ce n'est pas le cas, vous avez l'impression d'avoir perdu votre temps et votre argent.
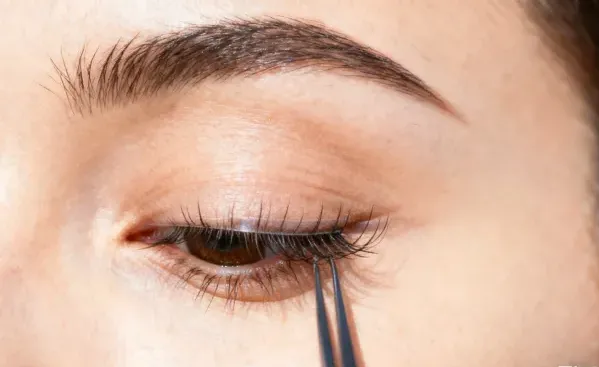
Les solution est dans la préparation. Comme pour la peinture d'un mur, vous avez besoin d'une surface propre. Vos cils naturels doivent être parfaitement propres. C'est l'étape la plus importante pour réaliser votre extensions de cils en grappe dernier.
La demande peut sembler être la plus grande problème. Vous êtes peut-être inquiet. "Et si je me piquais l'œil ?" "Et s'ils ont l'air de travers ?" Ces craintes sont normales. Cela peut être agitation de voir une minuscule grappe de cils au bout d'une pince à épiler et de se demander comment la placer au bon endroit.
Les solution est une méthode simple et éprouvée. Elle s'appelle la technique d'application sous les cils. Vous appliquez les cils sur les dessous de vos cils naturels. Cela présente deux grands avantages :
Décomposons les choses en petites étapes faciles.
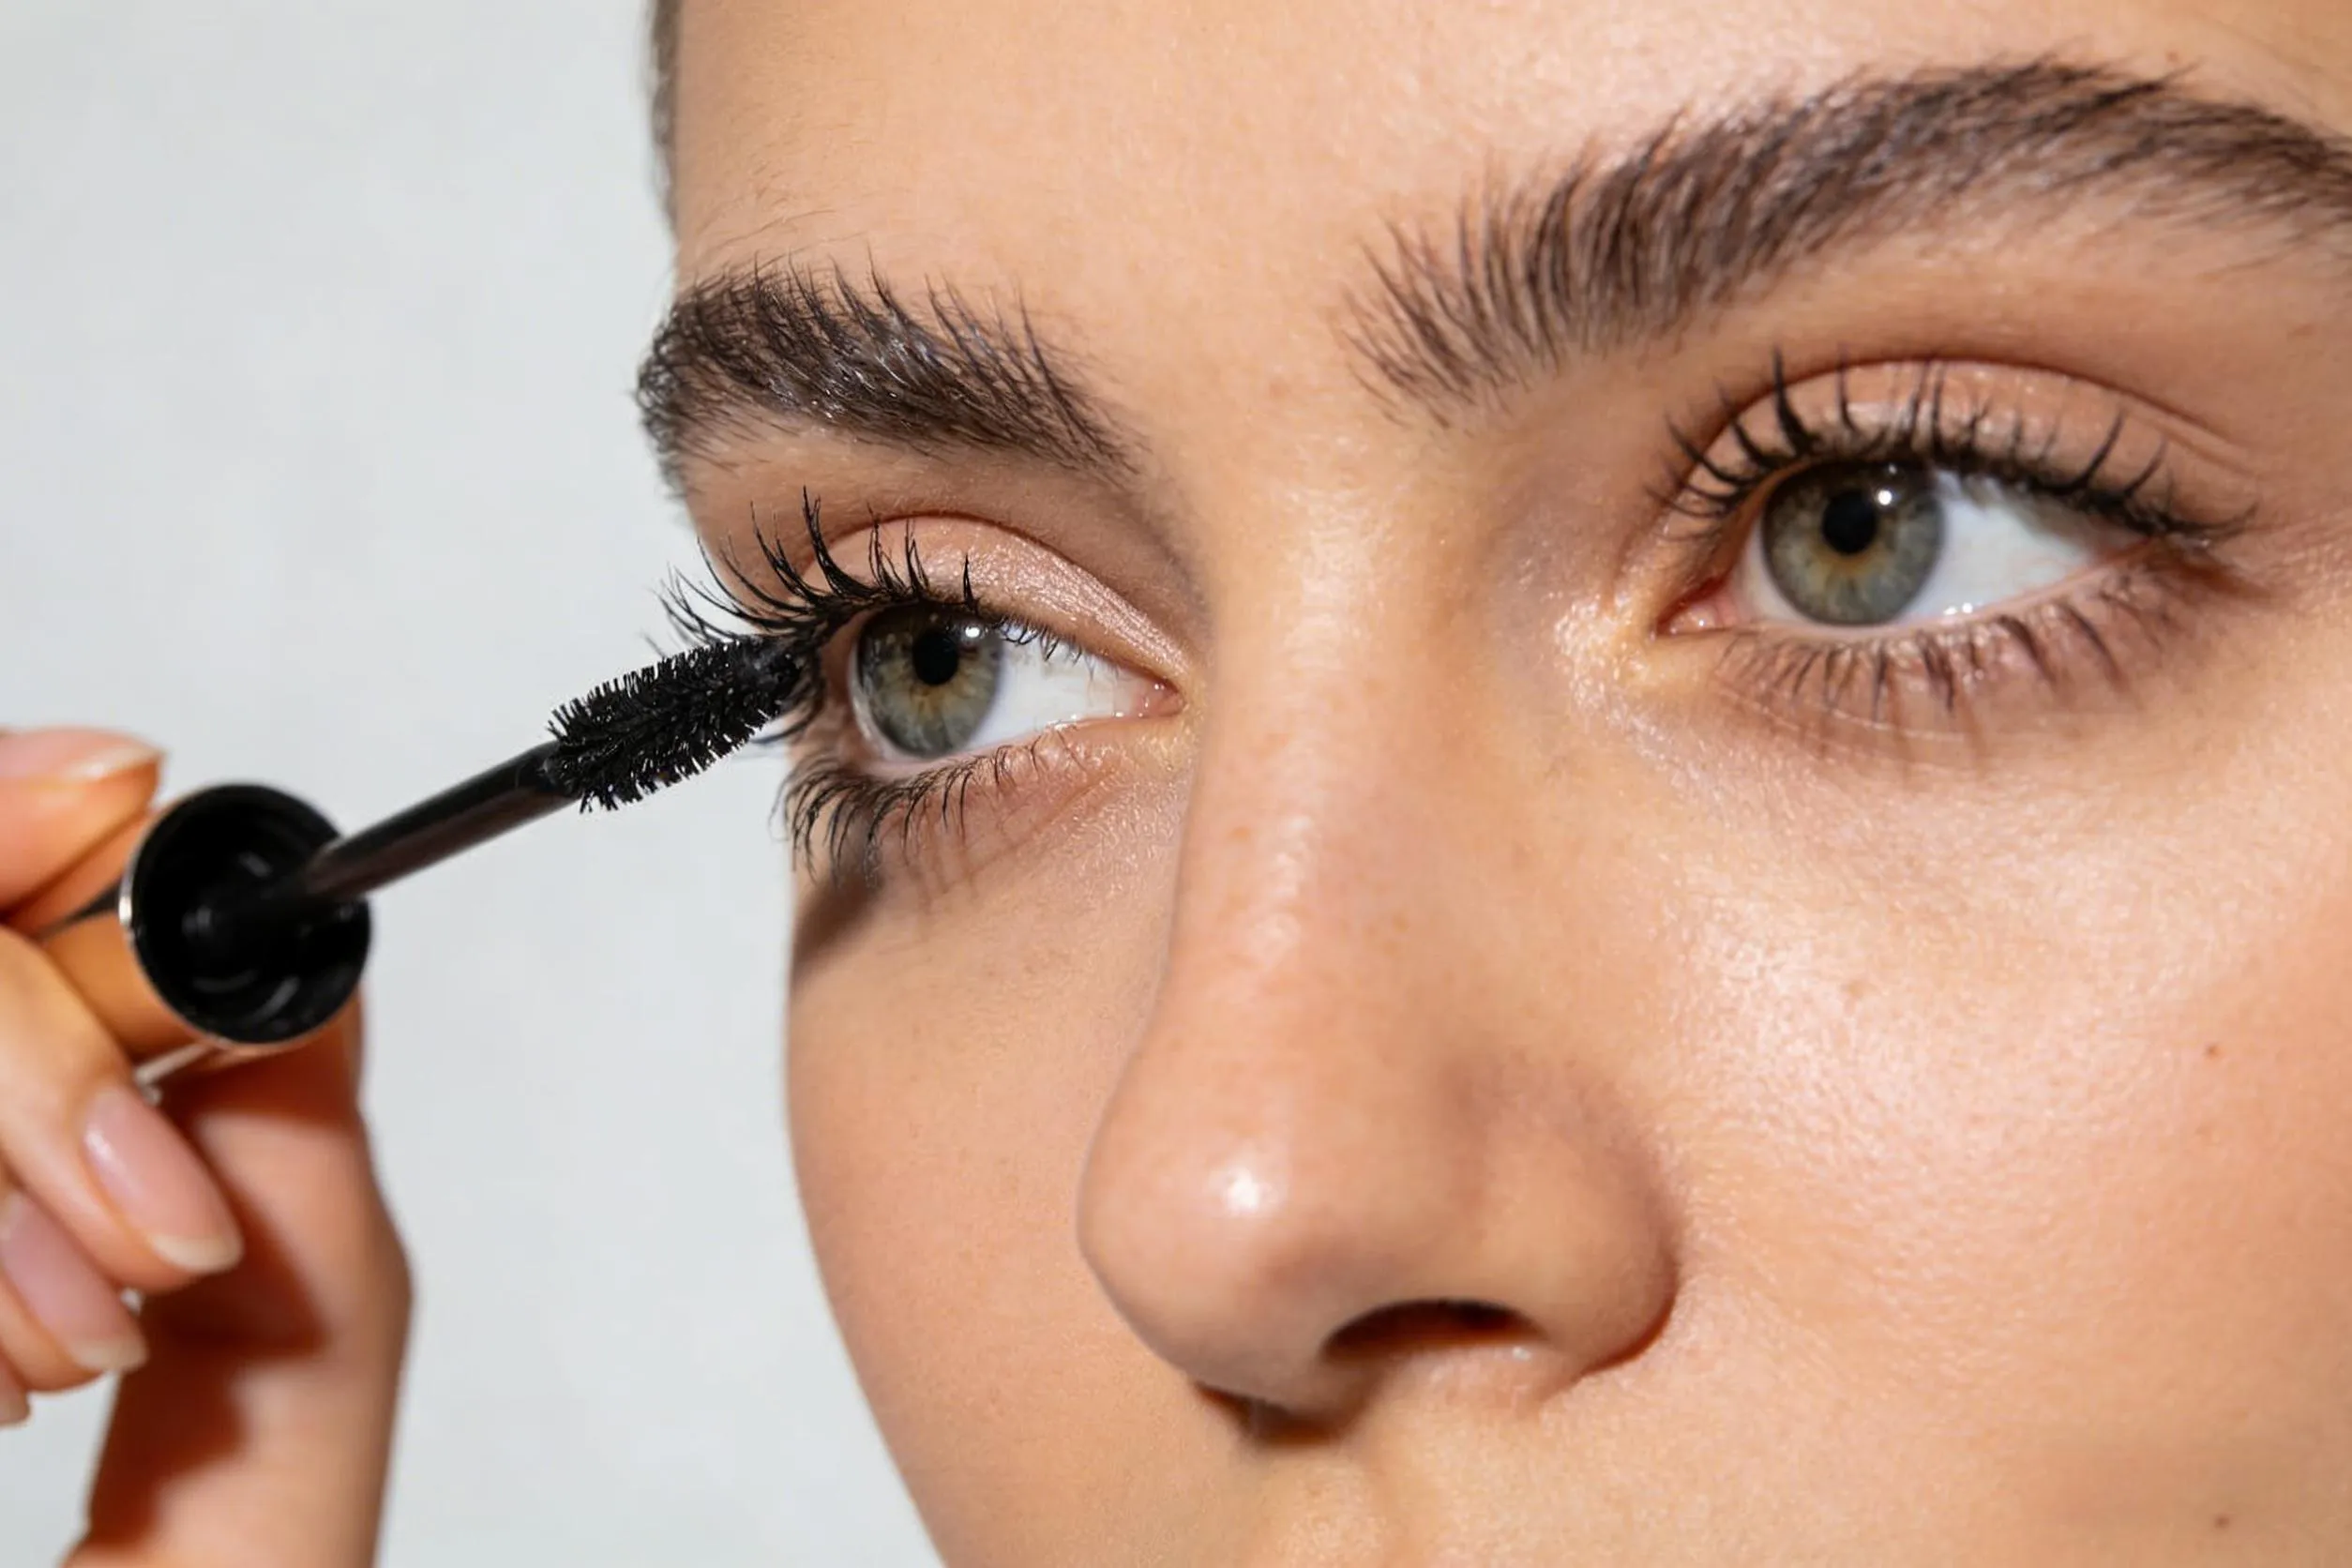
Pensez-y comme à un mascara. Prenez l'applicateur "bond". Essuyez le surplus de produit. Appliquez une fine couche à la base de vos cils naturels supérieurs. Concentrez-vous sur les 1 à 2 millimètres inférieurs de vos cils. Il n'est pas nécessaire de recouvrir tout le cil.
Il est préférable de commencer par le coin externe de l'œil et de progresser vers l'intérieur.
Prenez la grappe suivante. Placez-la juste à côté de la première. Vous pouvez les faire se chevaucher légèrement. Vous obtiendrez ainsi un résultat homogène et complet. Continuez jusqu'à ce que vous atteigniez le coin interne de l'œil.

Application des cils en grappe
C'est la partie la plus amusante. Les problème avec les bandes de cils, c'est qu'ils sont à taille unique. Mais tous les yeux n'ont pas la même forme. Les solution est un produit personnalisé carte des cils. Vous utilisez différentes longueurs de grappes pour créer un style qui vous convient parfaitement.
Un fournisseur fiable est la clé de la personnalisation. Une entreprise disposant d'une chaîne d'approvisionnement solide et de services OEM/ODM peut créer tous les styles que vous pouvez imaginer, qu'il s'agisse de cils ondulés naturels en gras cils roses ou même cils inférieurs.
Même avec un guide, vous pouvez être confronté à une problème. Votre premier essai peut être délicat. Cela peut être agitation. Mais n'abandonnez pas ! Les données provenant de milliers d'avis d'utilisateurs montrent quels sont les problèmes les plus fréquents. Les solution est d'apprendre d'eux.
| Zone de défi | Problème commun rapporté par les utilisateurs | Ce que cela signifie | Comment résoudre le problème |
| Longévité | "Mes cils tombent au bout de 2 à 3 jours. | ~45% des commentaires négatifs en parlent. | Soyez très prudent avec votre préparation des cils. Veillez à ce que vos cils soient 100% propres et exempts d'huile. Et ne sautez pas l'étape du "scellement" ! |
| Placement | "Ils ont l'air bosselés ou de travers. | C'est la frustration #1 pour les débutants. | Allez-y doucement. Utilisez une carte des cils. Et n'oubliez pas de placer le cil 1 à 2 mm de distance de votre peau. Bon pour la santé pince à cils sont indispensables. |
| Confort et sécurité | "Mes yeux sont irrités. | ~20% des utilisateurs s'inquiètent à ce sujet. | L'irritation est presque toujours due au fait que le cil est placé trop près de la peau. Conservez ce petit espace. Faites également une test épicutané pour la colle à cils. |
| Déménagement | "J'ai arraché mes cils naturels". | C'est une grande crainte. | Ne tirez jamais, jamais, sur les cils. Soyez patient. Utilisez un bon dissolvant de cils. Il dissoudra la colle pour que les cils s'enlèvent en douceur. |
| Courbe d'apprentissage | "Mon premier essai a duré plus d'une heure. | C'est normal. | La première fois, c'est pour s'entraîner. Au troisième essai, vous serez beaucoup plus rapide. Soyez patient avec vous-même. Un bon kit d'embrayage de cisaillement peut faciliter le processus d'apprentissage. |
Vous avez appliqué tous vos cils. Ils sont superbes. Mais il reste un dernier problème à résoudre. Comment les faire durer ? Ce serait si frustrant de les faire paraître parfaits, mais qu'ils se déplacent ou tombent un jour plus tard.
Les solution est la dernière étape, la plus importante : le scellement.
Vos cils sont en place. Ils sont superbes. Maintenant, le problème est de les maintenir en l'état. Il est également important de savoir comment les retirer en toute sécurité. Il est agitation de penser que vous risquez d'abîmer vos cils naturels. La santé de vos santé naturelle des cils est le premier.
Les solution est une simple routine d'entretien et de retrait.
Sceller vos cils pour les porter toute la journée
Q1 : Quelle est la durée de vie des cils en grappe ?
Avec une application et un entretien appropriés, ils peuvent durer de 5 à 7 jours, voire plus longtemps.
Q2 : Peut-on réutiliser les cils en grappe ?
C'est possible, mais il faut les nettoyer très soigneusement. Pour un look optimal et frais, il est recommandé d'utiliser un nouveau jeu à chaque fois. Une fabrication de haute qualité permet d'obtenir des cils haut de gamme à un prix abordable, ce qui vous permet d'avoir toujours un jeu de cils parfait à portée de main.
Q3 : Les cils en grappe endommagent-ils vos cils naturels ?
Non, pas si vous les appliquez et les retirez correctement. Le dommage vient du fait qu'on les retire, pas du fait qu'on les porte. La clé est un processus de retrait en douceur.
Q4 : Peut-on prendre une douche avec des cils en grappe ?
Oui, après les premières 24-48 heures. Essayez de ne pas laisser l'eau chaude pulvérisée directement sur les yeux pendant une longue période. Lorsque vous vous séchez le visage, tamponnez délicatement vos yeux pour les sécher.
En choisissant des produits de qualité auprès d'un fournisseur de cils spécialisé et en suivant ces étapes scientifiques, vous pouvez résoudre le problème de l'obtention de beaux cils. Vous pouvez éviter la frustration et le coût élevé des salons de coiffure et obtenir un look impeccable et personnalisé chez vous. Il suffit d'un peu d'entraînement. Vous pouvez le faire.